

A Mini Sampler of the Six Basic Needlepoint Tent Stitches
Brush up on your needlepoint basics or use up a bit of your stash with this mini tent stitch sampler.

Hope you all had a lovely weekend!
On this beautiful spring day, I wanted to share with you a mini sampler idea you can create to practice your tent stitches!
If you’re just beginning your needlepoint journey or looking to brush up on the basics, starting with a mini sampler of tent stitches is a fun and foundational exercise. Tent stitches form the backbone of most needlepoint work, offering strength, coverage, and flexibility in design. While they may all look similar on the front, the direction you stitch in can make a big difference on the back of your canvas—and even how your threads lay and wear over time.
While there are different schools of thought on the back of your canvas, the only thing that matters to me is that if you are not using a frame (I typically don’t), how your threads lay determines the ability to block (re-straighten) your stitching and how long the work will last—especially when your projects may get a lot of love, like a belt or seat cushion. So, even tension and directionality are what I consider most.
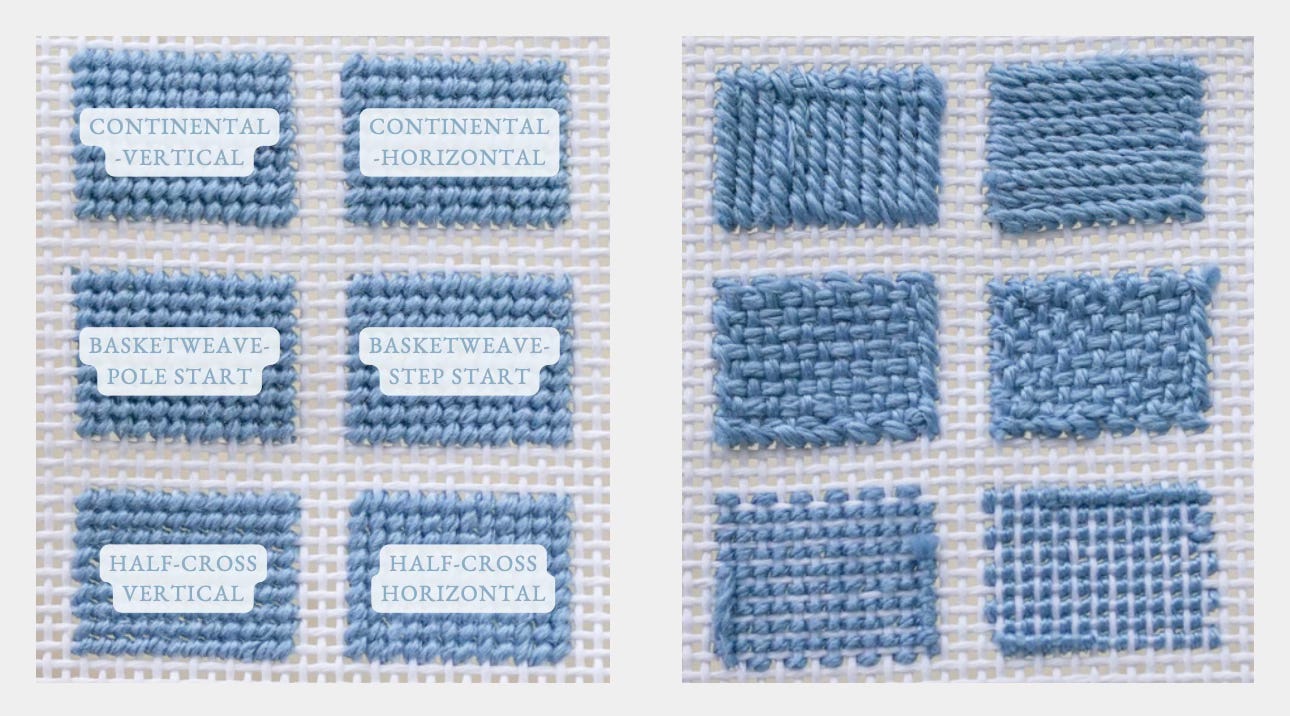
In this post, we’ll explore six essential tent stitch variations:
Vertical Continental
Horizontal Continental
Vertical Half-Cross
Horizontal Half-Cross
Basketweave with a “poll” start
Basketweave with a “step” start
Grab a small piece of canvas, six different thread colors (optional but helpful), and let’s create a mini sampler together!
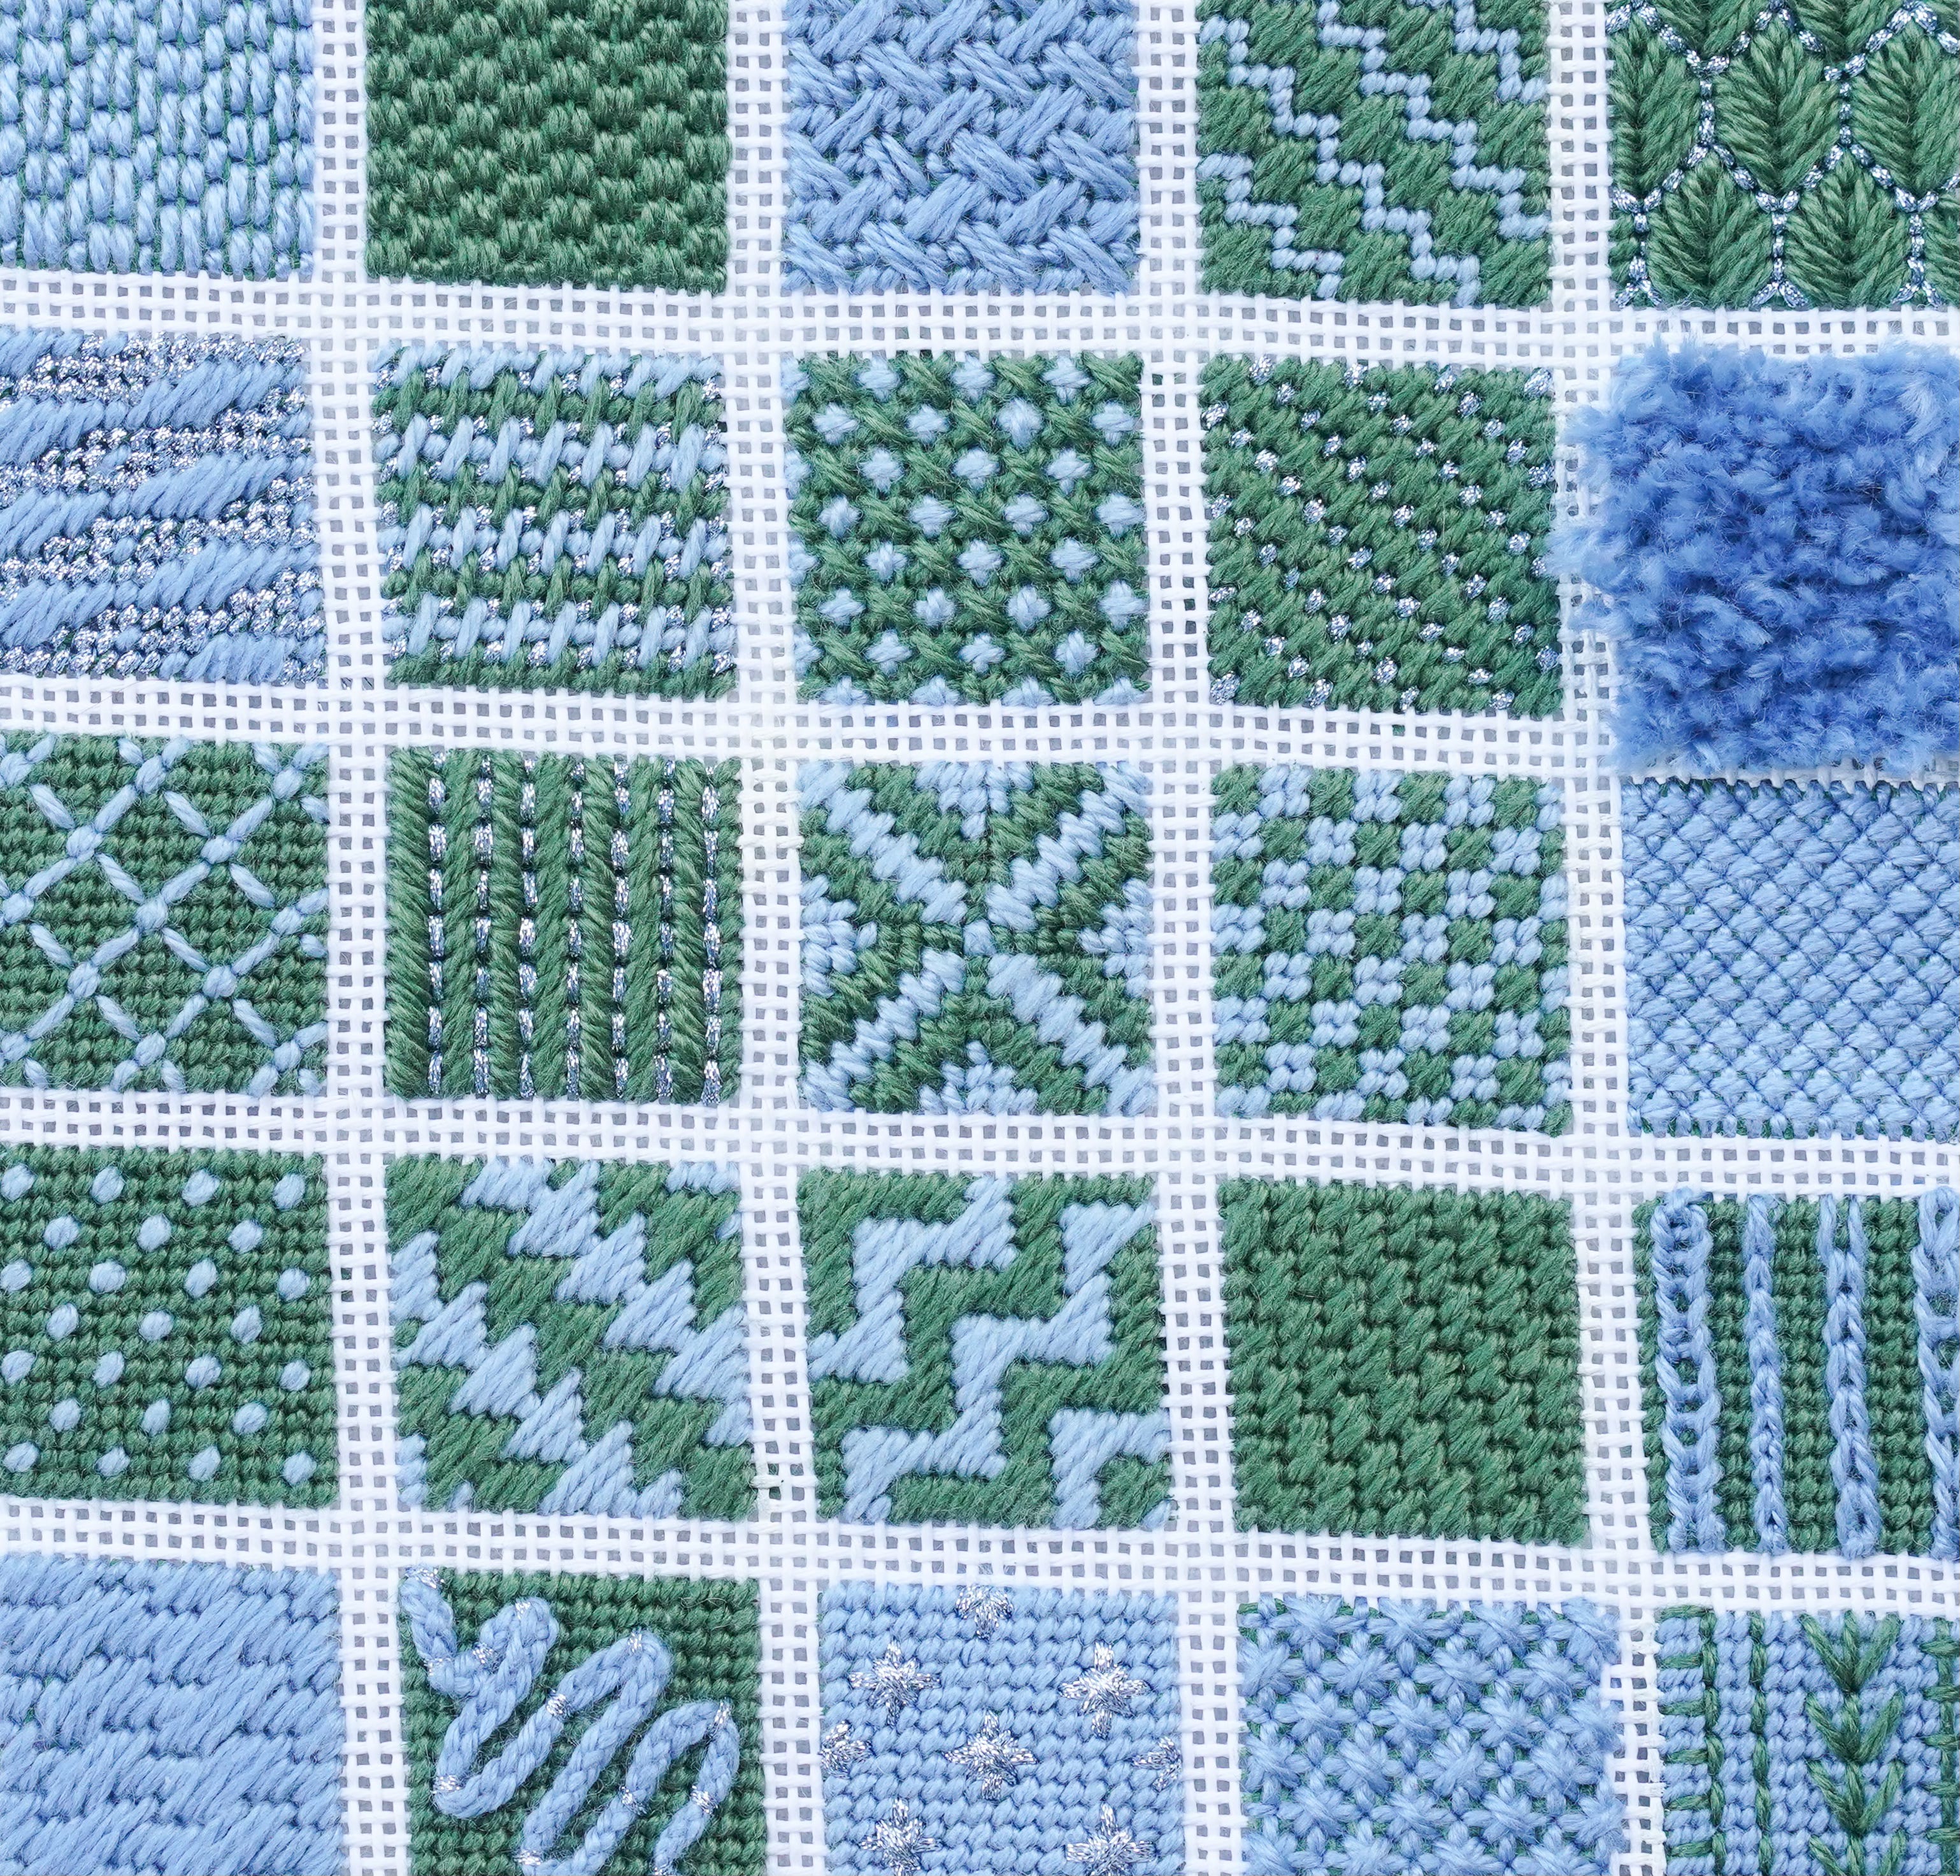
Please note: While the Half-Cross Stitch is included in this guide, I personally do not recommend it for large areas. It can be beneficial for certain things, including economic stitching; however, after long conversations with needlepoint finishers, it compromises durability and blocking potential for finishing. In excess, it can warp your canvas and not provide any give when blocking. A sprinkling of use for navigating tricky areas is okay! I have provided samples of what the back looks like (above) so you can see why, and the methods for stitching as a very polite what not to do. Sometimes it is necessary for compensating your decorative stitches.
What Is a Tent Stitch?
A tent stitch is a small diagonal stitch that crosses over one horizontal and one vertical thread intersection on the canvas. It covers a single canvas intersection and is worked in a slanting pattern, typically from lower left to upper right (/). The beauty lies in the back—each variation has a unique structure that affects tension, wear, and ease of stitching.
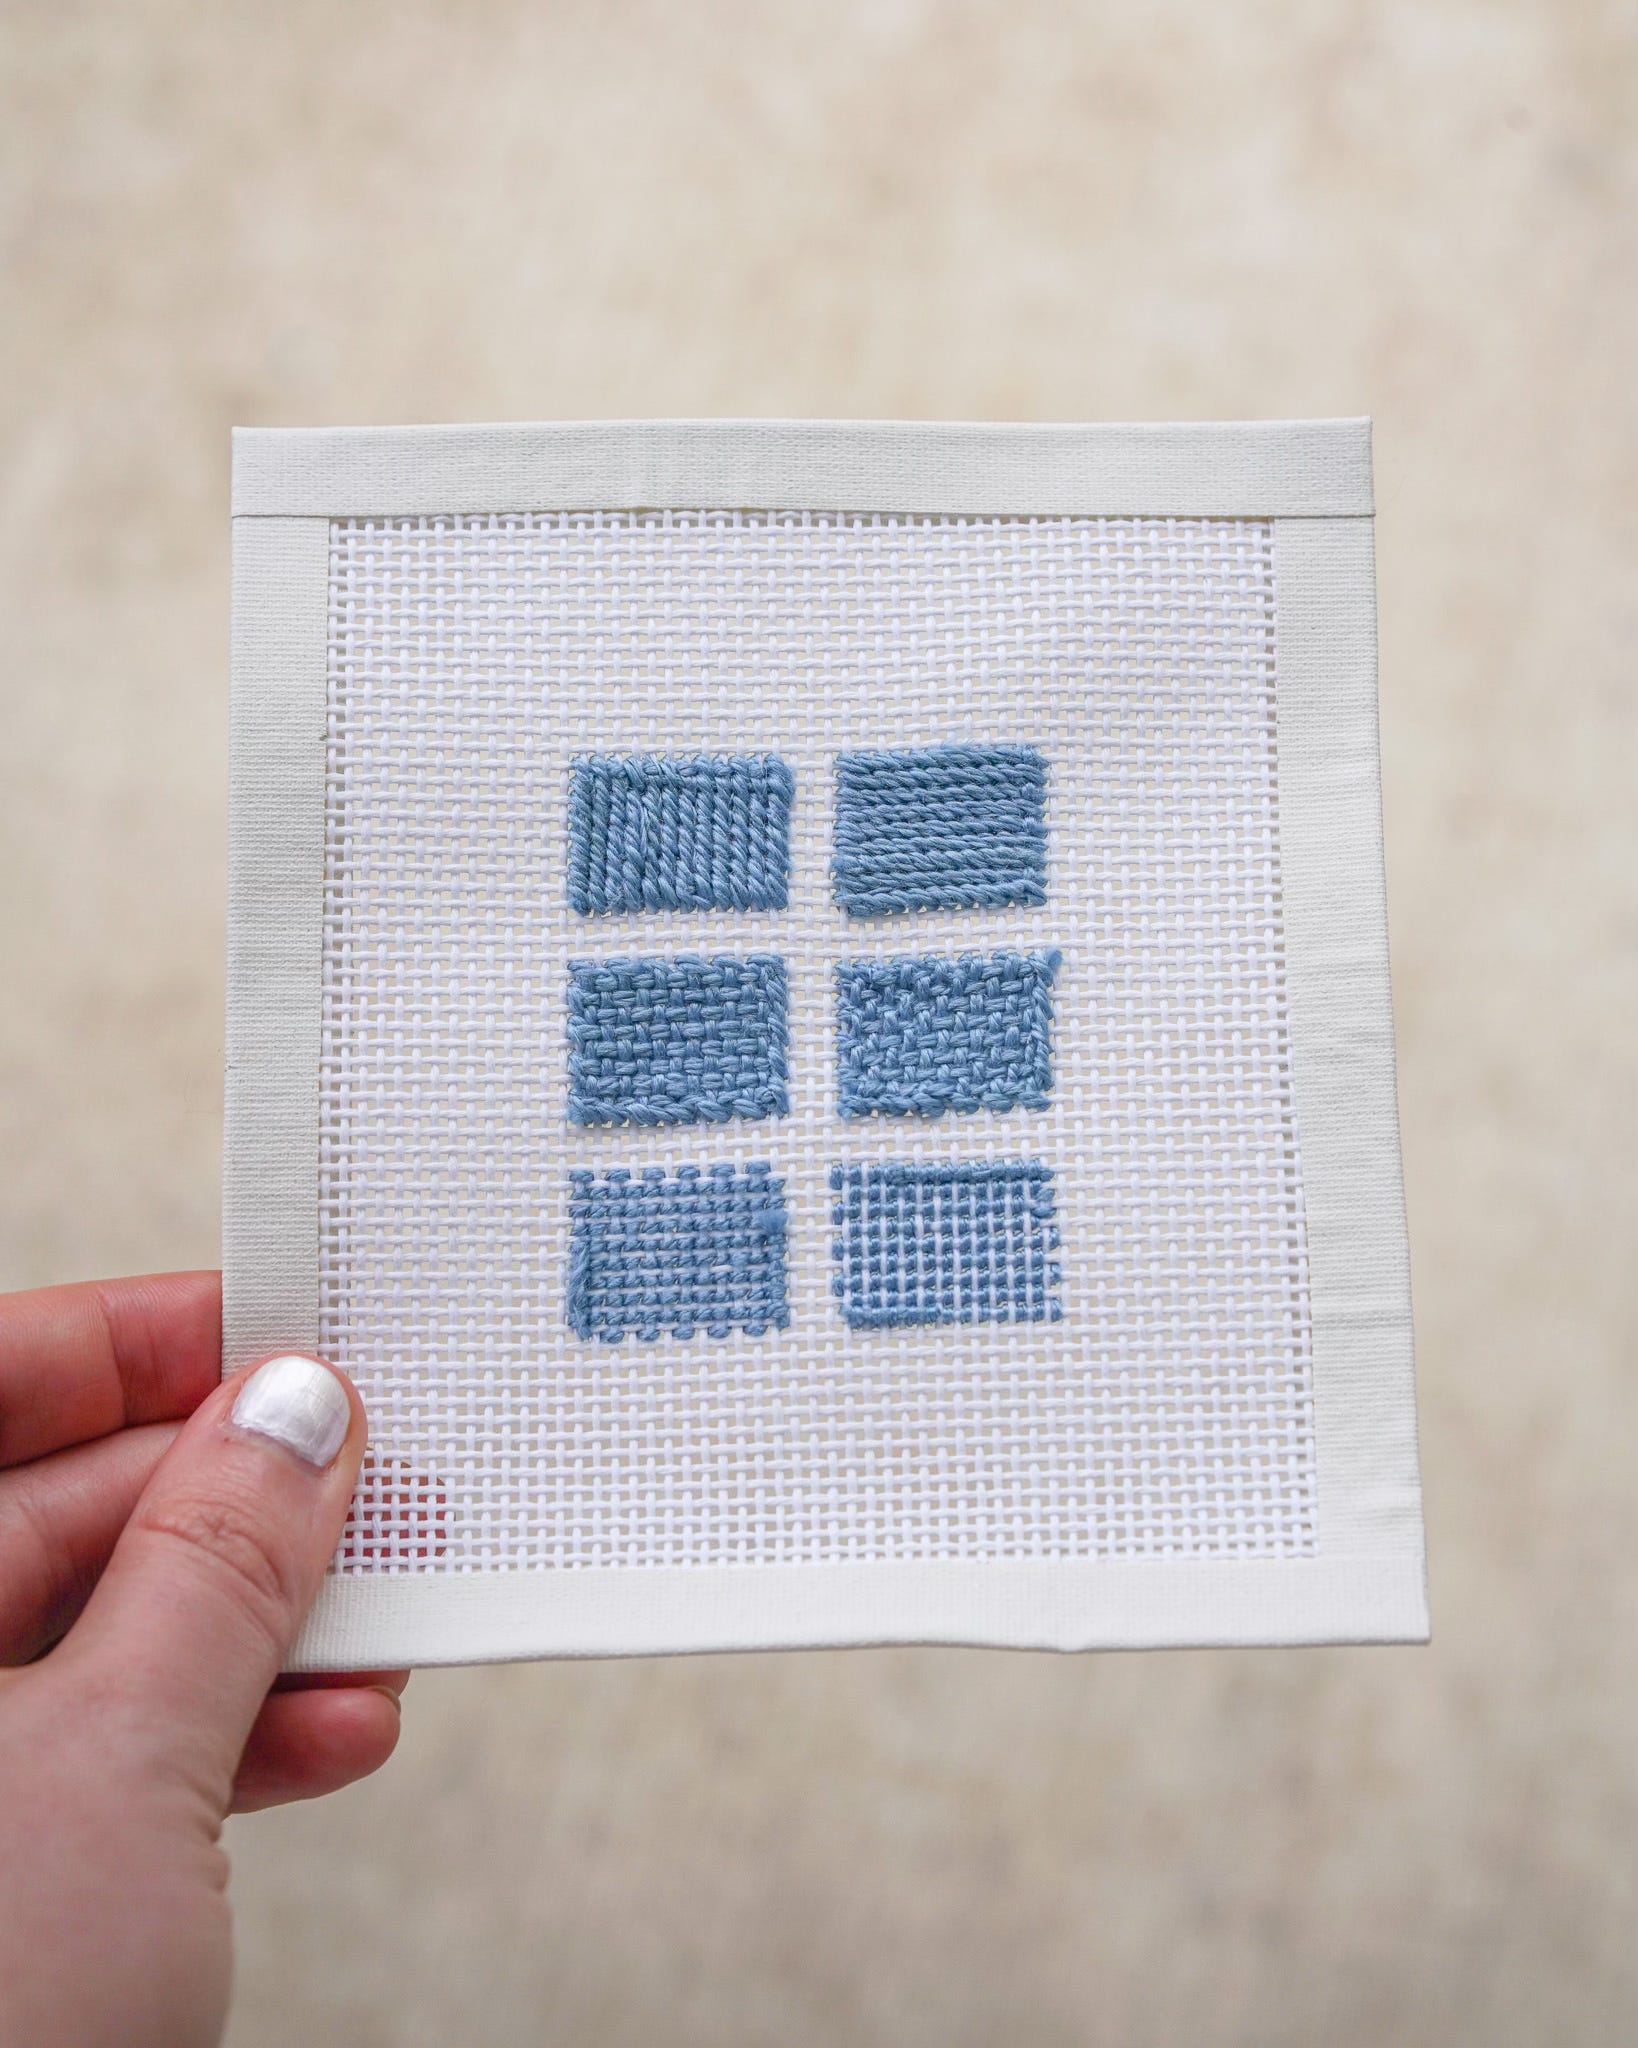
🪡 Making a Mini Sampler
To make a sampler, divide a small canvas into six squares (or rectangles). If you need organizational support, use a micron pen or some acrylic paint to determine the outline. Then, fill each square using a different tent stitch variant. It’s a great reference for future projects and a satisfying way to see how different the same stitch can look based on your stitching direction.
You’ll end up with:
2 vertical stitch blocks
2 horizontal stitch blocks
2 basketweave blocks
Want to use up some of your stash? Try using six different thread colors or subtle shifts in shades to highlight the difference even more!
The Stitches:
THE CONTINENTAL:
Beginners will find the Continental Stitch an easy and reliable choice for needlepoint. This basic needlepoint stitch creates a smooth, even surface that serves as an excellent backdrop for more intricate designs. Aim for even tension with uniform stitches to ensure a polished appearance when working the Continental stitch. This section is dedicated to stitches adjacent along the rows and stacked in columns. Be mindful that you use the reverse technique on alternating rows and columns. Refer to the chart for reference.
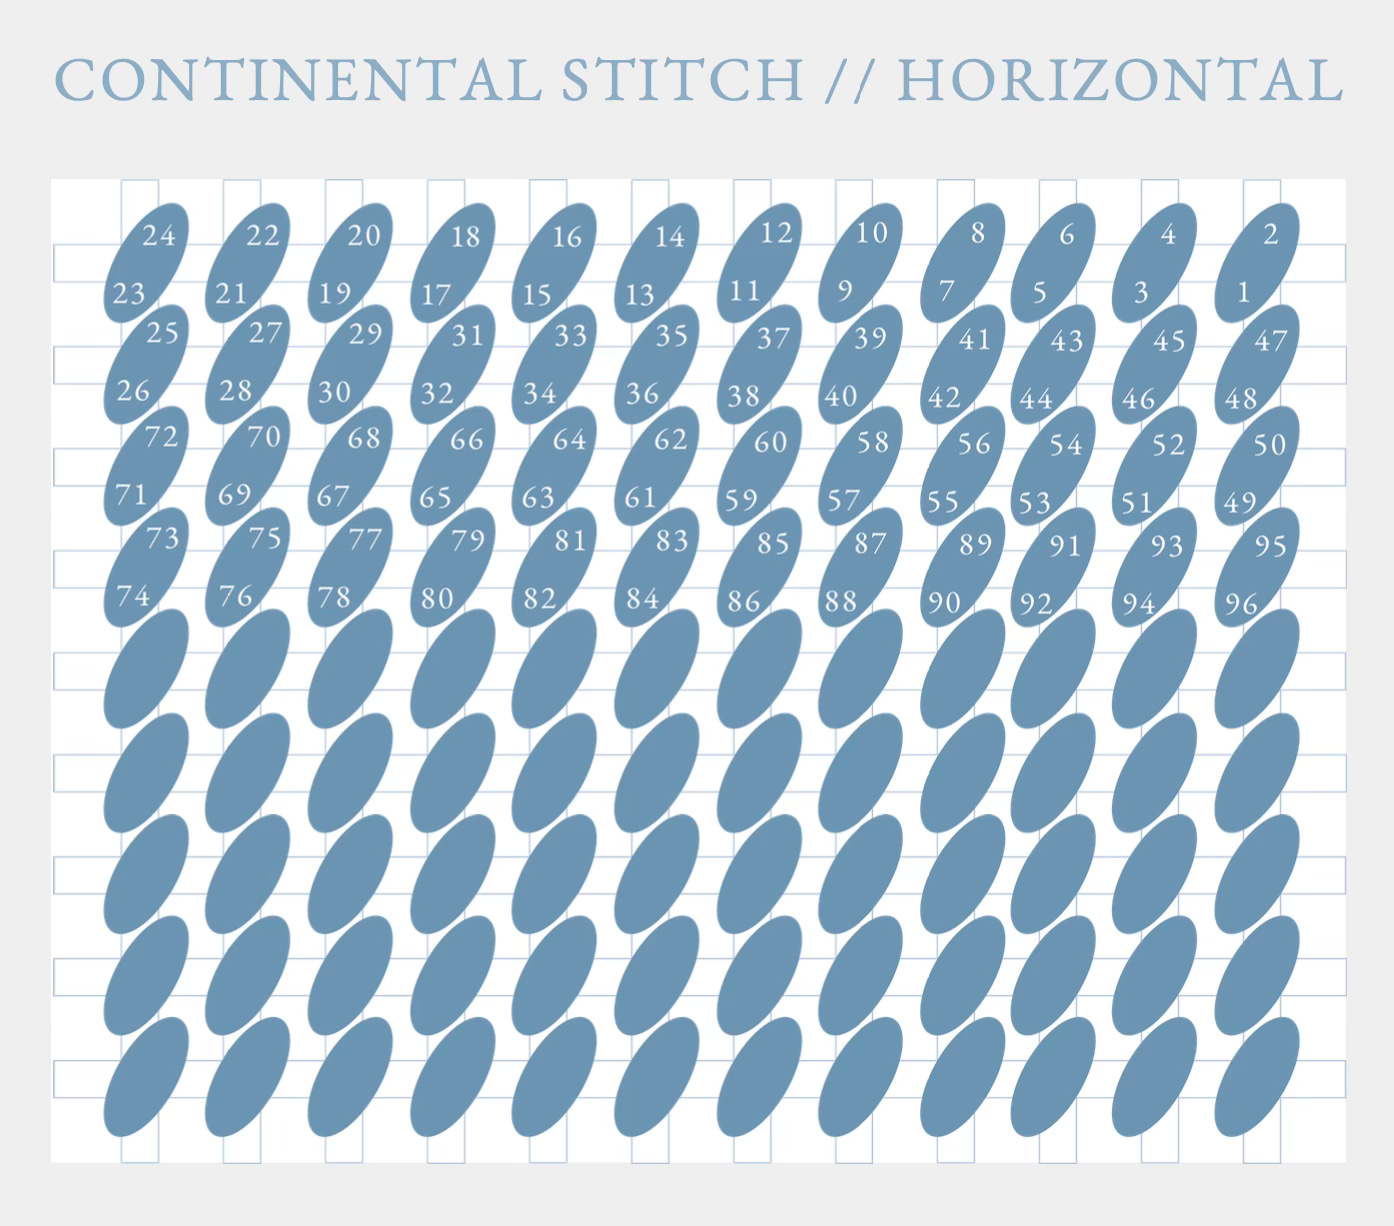
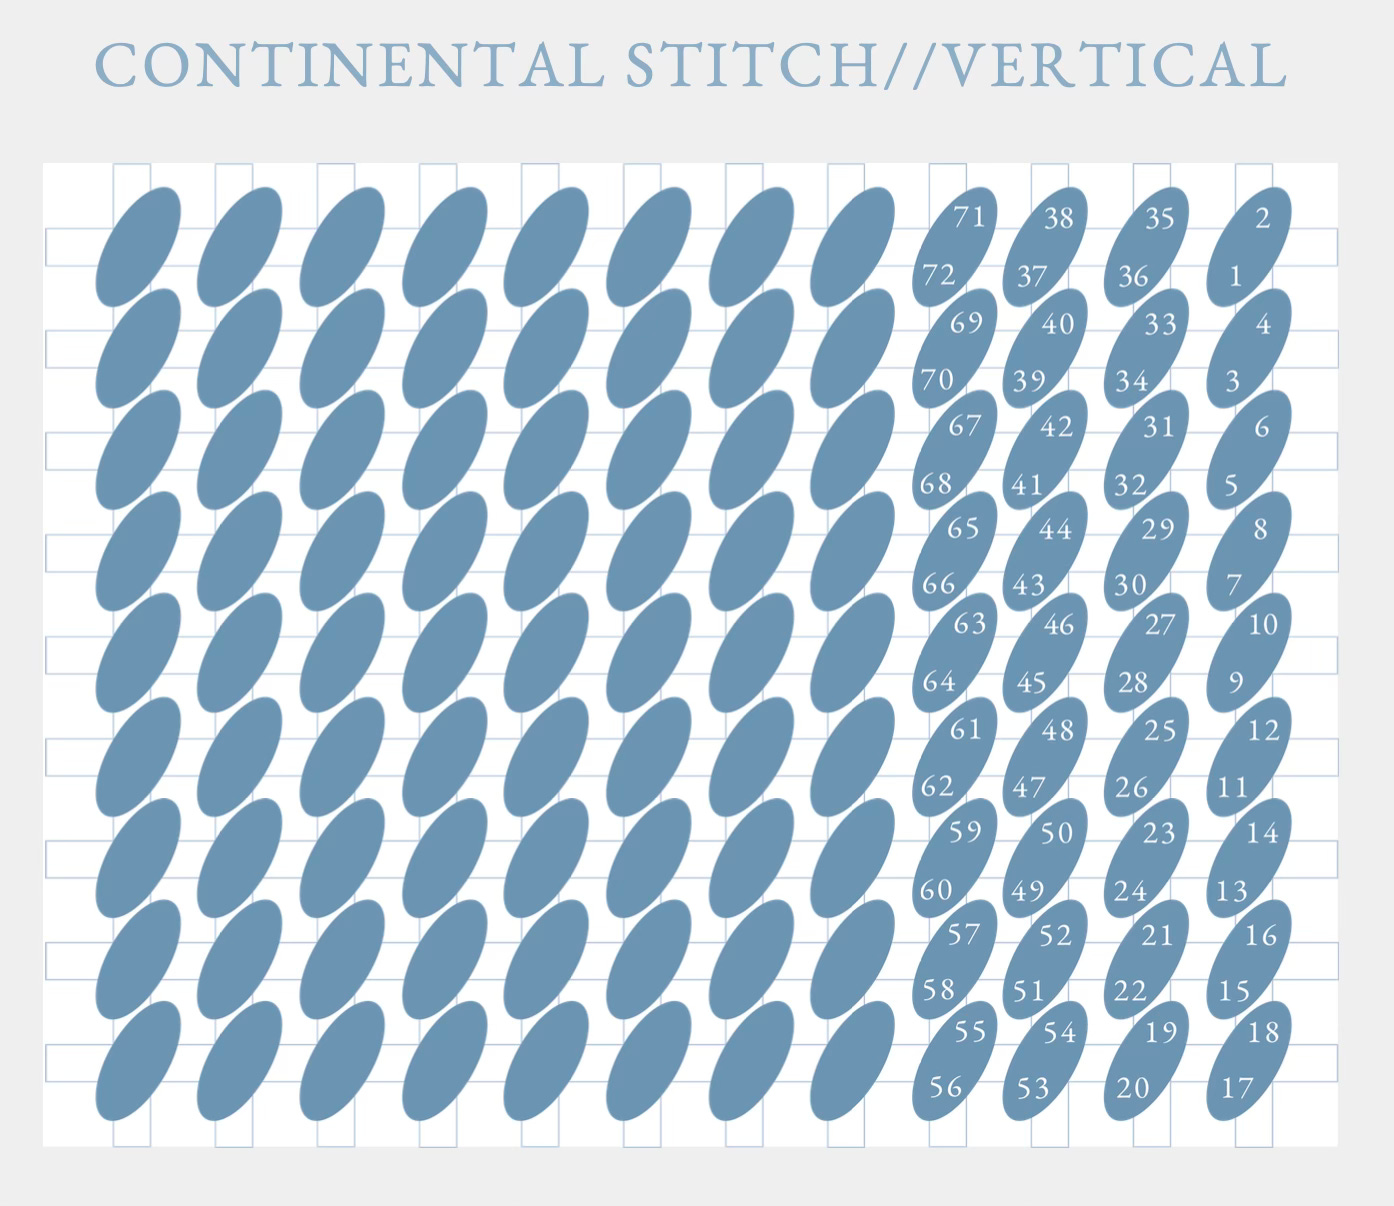
Direction: Work vertically or horizontally in columns and rows, stitching from top to bottom or side-to-side.
This version of the continental stitch gives strong coverage and a consistent backside with diagonal lines. It’s great for vertical areas and curved shapes.
🧵 Tip: Keep your tension consistent, and always bring the needle up on the same side of each stitch to avoid distortion. When returning to your starting point, you will be reversing the orientation in contrast to the half-cross technique.


THE HALF-CROSS:
The Half-Cross is similar to the Continental Stitch, however, it uses the least amount of thread possible while still achieving a tent finish on the front of your canvas. As a result, alternating columns and rows do nearly the opposite of the continental stitch to do so. It can be a handy technique when you‘re playing thread chicken or are in a bind in a particular part of your project. As noted above, I personally do not recommend it for large areas of your canvas as it does not provide much durability or blocking flexibility.
Direction: Work horizontally in rows or vertically in columns, using the shortest path behind the canvas.
The diagonal front looks the same, but the back is horizontal or vertical. This is helpful when you need to conserve thread or are working in tight spaces.
Use: Half-cross is the quickest, most thread-efficient tent stitch. It’s often used for quick fills—but it lacks the full coverage and support of continental or basketweave.
🧵 Try this: Use a lighter or variegated thread to see how color changes differently with shorter backing.
🧵 Warning: Less support on the back means the front may appear thinner and uneven if you use thin or shiny threads.
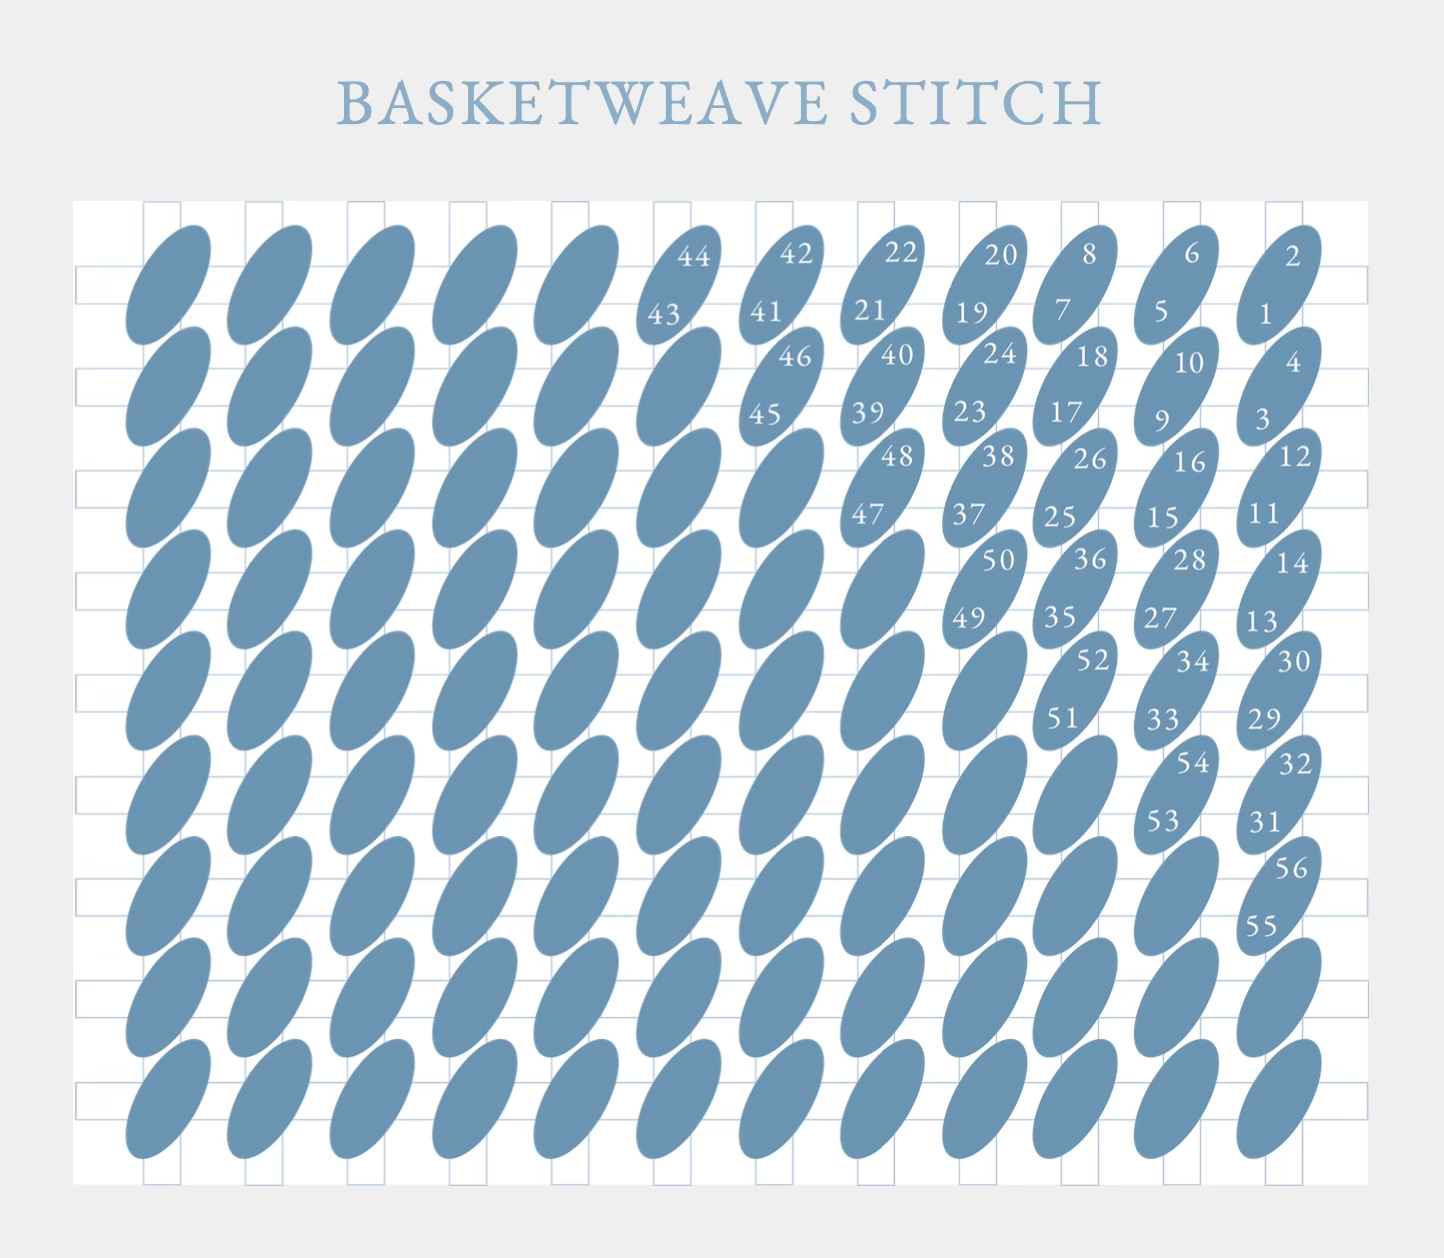
THE BASKETWEAVE:
The Basketweave gets its name from the basket-like formation that takes place on the back of your canvas when you follow a particular protocol that follows stitches on a diagonal. To achieve the best results, stitch southeast to northwest up the part of the canvas weave that is horizontal, called the steps, and back down from northwest to southeast on the part of the canvas weave that is horizontal, called the poles. If you like to stitch in-hand, this technique prevents warping and adds durability.
Direction: Stitching diagonally up and down the canvas creates a basket-like weave on the backside of your work.
🧵 Best for: Large coverage areas—this stitch won’t warp your canvas nearly as much as other stitches.
For more information on basketweave, I have an entire post dedicated to this technique!
Enjoy your sampler!
Mastering these six tent stitch basics will set you up for success in any needlepoint project—from detailed portraits to bold modern designs. A mini sampler is the perfect portable project, and you’ll gain an intuitive understanding of thread usage, texture, and tension that no tutorial alone can teach.
Decorative stitches can be a great way to add an extra creative flair to your needlepoint projects. However, even after ten years of designing, tent stitching—a mix between Basketweave and Continental—is still my favorite way to approach a canvas.
If you do want to dive into decorative stitches, I highly recommend Stitches To Go by Suzanne Howren & Beth Robertson.
If you like the sampler option, I have two digital sampler guides. They can be found here for volume I and here for volume II.
Thank you for reading, and stay tuned for more needlepoint tips and art lessons!
xo,
Brooke